
Pi²R Micro Installation Manual
Step 1: DC Cables
There is a debate about DC wires needing to be multi-strand where AC wires needs to be solid core or house wire. The DC cables do not need to be multi-strand. Solid core or house wire will also work fine as long as the wires are thick enough and protected from sun and weather. Multistrand bends and works easier than alternatives.NOTE:
Proper Solar cable usually comes as multi-strand.
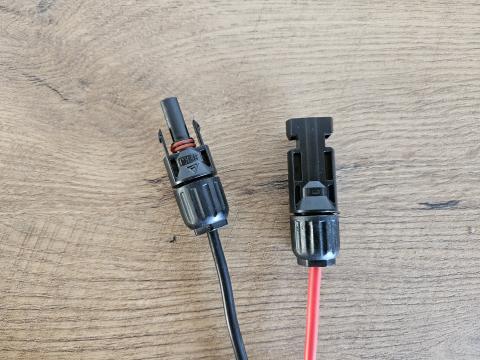
Install MC4 connectors onto chosen cables. Note that the colours seem reversed as the red wire should connect to the PV positive which has a male MC4 connector. The black wire should connect to the PV negative which has a female MC4 connector.
NOTE:
It is good practice to use an in-line fuse (not shown in the picture) in the DC cables close to the PV side so that the fuse can do its work if a fault occurs somewhere in the middle of the wire or inside the Micro unit.
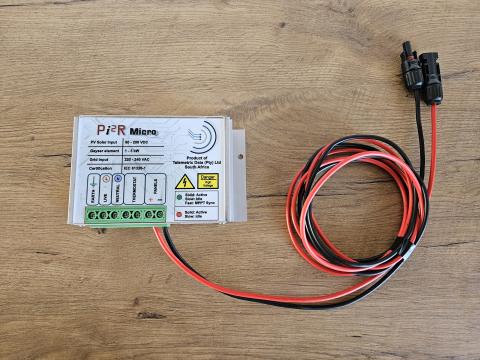
Next is to connect your prepared wires directly to your Micro or iX unit.
NOTE:
It is good practice to double-check your polarity using a standard multi-meter.
Step 2: Thermostat
It is generally not necessary to remove the thermostat from the geyser for this step. The thermostat in the picture was only removed to be able to show detailed pictures.Install wires to the existing thermostat and set to the clients' required temperature on the thermostat.
The Micro will either choose between AC power or DC power and always feed the thermostat with the appropriate power. The thermostat will monitor and control the water temperature, not the Micro unit.
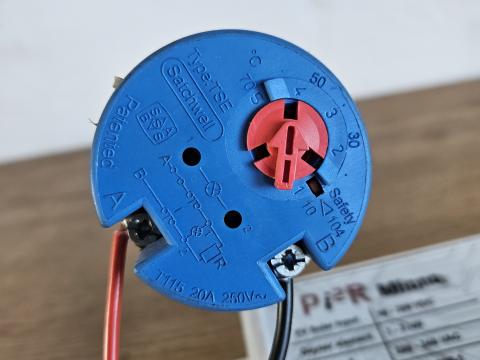
If the geyser has a non-standard thermostat, connect as if the wires would have come directly from AC power.
Connect the other end of the thermostat wires to the Micro.
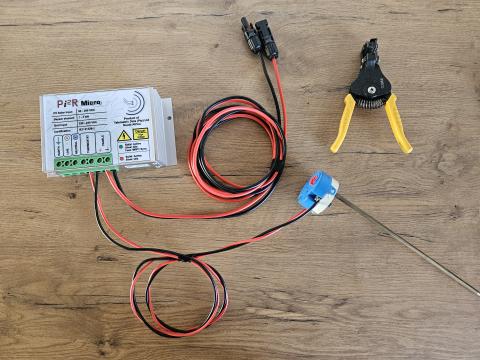
At this point you are done with the renewable side. For off-grid installations you may proceed to Step 4 and finish up, but keep in mind that it is still required to connect an earth-wire as normal.
Step 3: AC Power
Connect Earth, Neutral and Live wires from your isolator switch to the Micro unit as shown in the picture.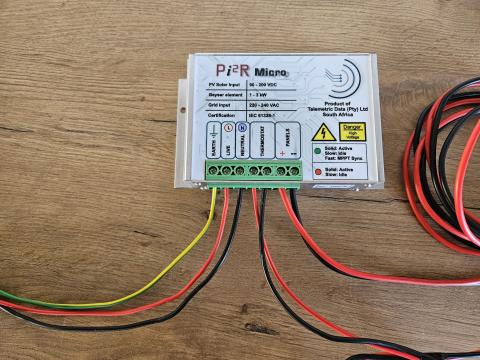
Step 4: Finishing
Now that everything is connected:- Plug the thermostat into the geyser element Inspect the element connectors for any damage and repair if needed. The element draws considerable amounts of amps and hot connections can be very dangerous.
- Connect the MC4 connectors to the PV panels The element should start drawing power at this point.
- Switch on AC power and set up DB Timer For maximum savings, the timer should feed power about an hour or two before water use and ideally stop feeding power shortly before water use.
NOTE: When the geyser is warm enough, AC power will be available but not used.
- Solid green: The Micro is feeding PV to the thermostat/element and the water is cold enough to still draw power.
- Flashing green: The Micro is feeding PV to the thermostat/element, however the water is warm enough that the thermostat is switched off.
- Solid red: The Micro is feeding AC to the thermostat/element and the water is cold enough to still draw power.
- Flashing red: The Micro is feeding AC to the thermostat/element, however the water is warm enough that the thermostat is switched off.
- Alternating Red/Green: The PV power is measured every 10 minutes and the appropriate weather conditions recalculated to maximize power harvesting.
Troubleshooting
Micro only uses AC and refuses to use PV
Check timer mode and settings.Micro never uses AC
Check timer mode and settings.Micro has no light coming on
Check that power is coming through to the unit.Multi-meter reads 120Vdc on panels but varying 0-120Vdc on the element
Correct, this is how the weather conditions and PV characteristics are adjusted to the specific element.
When AC is available it is always sent to the geyser, this is to ensure that the geyser can be manually forced to heat from AC during bad weather.
Check that the isolator switch close to the geyser is switched on.
If power is coming through, it may be that your unit is faulty. Return for testing and repairs.